Showing posts with label Punches. Show all posts

Thursday, March 31, 2011

Two Kinds of Cupcakes

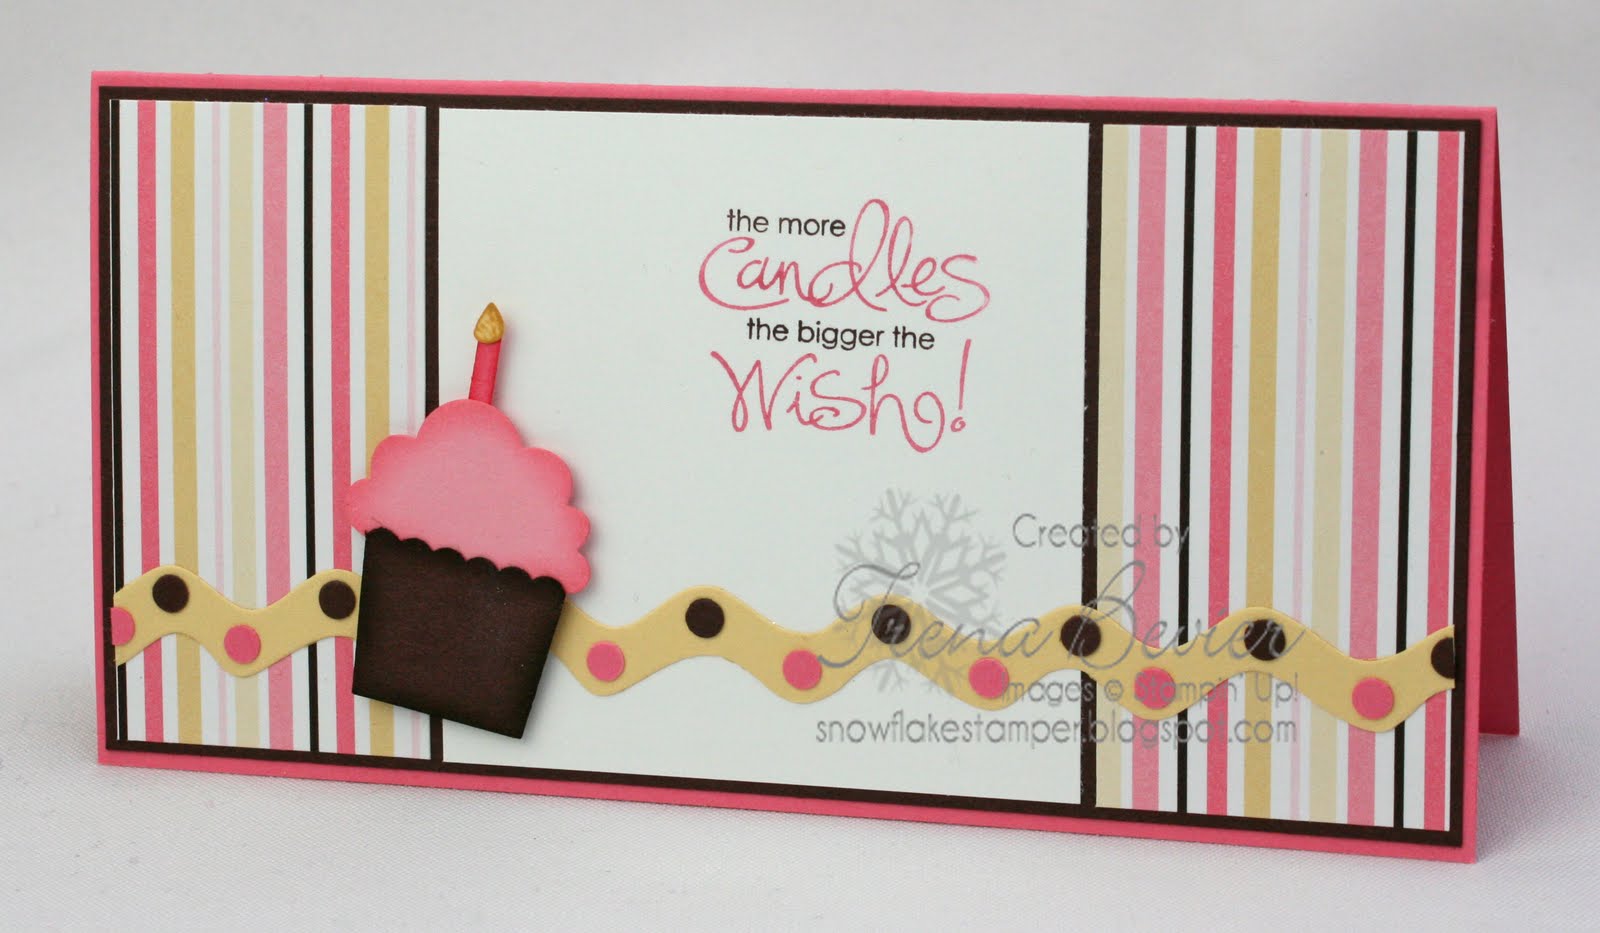
I'm still on my cupcake kick - I'm pretty sure I always will be. I made some cupcakes last week for my daughter's TA (for those of you who don't have children in school, a TA is basically a homeroom). I made a cake for her birthday and I had just enough batter and icing left to make cupcakes for her to take to school. Cupcakes ~ breakfast of champions! I'm totally kidding, although they really did eat them in the morning. I would have preferred it if the kids had saved them 'til lunch, but I knew that wasn't much of a possibility once they left the house. Can you imagine giving a group of teenagers cupcakes in the morning and telling them they HAVE to wait until lunch? I shudder just thinking about the protests. Anyway, my cupcakes haven't only been the ones with sugar, eggs, and flour as you can see by my project for this post. I wanted a card for an older sketch challenge and this is what I made. This Build a Cupcake Punch is sooo cute ~ I used it last week for a different project with my stamp club and my customers loved it! The striped paper I used for this card is from a retired Simply Scrappin' Kit. Sometimes I'm ready for products to retire, but there are other products that I can't get enough of and this kit is one that I definitely miss. The colors in it are "my colors" and the paper adds a sense of whimsy to this card. To create the border, I simply punched cardstock circles and glued them to the rick rack. It's such a fun card and it was oh so easy to make. Thanks for visiting!

Stamps: Whimsical Words (retired) Ink: Chocolate Chip, Pretty in Pink, Regal Rose & So Saffron Paper: Whisper White, Choclate Chip, Pretty in Pink, Regal Rose & So Saffron Cardstock Accessories & Tools: Build a Cupcake XL Punch, 2-Way Glue Pen, Non-Stampin' Up! Die (for rick rack), Love Sparkles Simply Scrappin' Kit (retired), Choclate Chip & Regal Rose Markers, Sponge Daubers, Stampin' Dimensionals

Wednesday, March 23, 2011

Pea-in-a-Pod Page

I did this scrapbook page as one of the projects for my February Punch Class. My original plan was to have the part where the photo is flip up to reveal the baby 411 underneath, making it a birth announcement. Unfortunately, I don't have a stamp set for birth announcements, so I just made it a scrapbook page. I still think it would make a cute birth announcement if you have the stamp set to do it though. Thanks for visiting!

Stamps: Baroque Motifs
Ink: Old Olive, Certainly Celery, Blush Blossom (retired) & Pretty in Pink
Paper: Pretty in Pink, Blush Blossom (retired), Whisper White, Old Olive & Certainly Celery Cardstock
Accessories & Tools: 2"x1-3/8" Oval XL, 3/4" Circle Medium, 1/2" Circle Small & Itty Bitty Shapes Punch Pack Punches, Basic Pearls, Sponge Daubers, White Gel Pen, Black Marker, 2-Way Glue Pen, Stampin' Dimensionals

Sunday, March 20, 2011

Build a Cupcake Birthday Card

If I haven't said it before I will now; I'm a sucker for anything to do with cupcakes. When this Build a Cupcake Punch was released, it was the first thing on my wishlist (along with the Create a Cupcake stamp set) because I knew I couldn't live without it. OK, so maybe I could live without it, but I really, really wanted it. For this card I used Sweet Sunday Sketch Challenge 89. I did a little sponging on the cupcake pieces to give them a bit more dimension, and added some accents with a white gel pen as well. The buttons are the retired corduroy buttons, but you could easily substitute the 5/8" Jumbo Brads. I also used the Patterns Designer Series Paper, of which I am a huge fan. Thanks for visiting!

Stamps: Create a Cupcake
Ink: Regal Rose, Pretty in Pink & Chocolate Chip
Paper: Very Vanilla, Regal Rose & Chocolate Chip Cardstock, Brights & Subtles Patterns DSP Stacks
Accessories & Tools: Build a Cupcake & Scallop Edge Border Punches, Chocolate Chip Corduroy Buttons (retired), Sponge Daubers, uni-ball® Signo Gel Pen, Stampin' Dimensionals

Sunday, February 20, 2011

Extended Word Window Punch

I mentioned yesterday that I would try to post a photo of how I extended the cardstock that I punched with my Word Window Punch; here it is. I also double-checked the measurement and it is not quite 3/8", it is between 5/16" and 3/8". For those of you who are challenged when it comes to measurements, most rulers are divided into 16ths, so 5 lines would be 5/16". Just place your cardstock between the 5th and 6th lines and you'll have the correct size. I find that there are quite a few people for whom reading a ruler is confusing. Having spent 13 years as a professional picture framer I'm not one of them, so I'm happy to clear up any confusion for those for whom it might be. Thanks for visiting!

Wednesday, April 28, 2010

Punchy Sheep Card

This little sheep is one of the projects that I did with my customers in this month's punch class. Isn't it cute? I decided to go with pink because a friend of mine is having a baby girl next month.
The photo isn't that great, but you get the idea. Thanks for visiting!

Edited: I had scheduled this post last week when my friend was due to have her baby next month, but the baby arrived early yesterday morning. :o)

Stamps: Well Scripted
Inks: Pretty in Pink
Paper: Whisper White & Pink Piroutte Cardstock, Pink Pirouette Patterns DSP (retired)
Accessories & Tools: Scallop Edge Punch, Word Window Punch, Scallop Circle Punch, 5-Petal Flower Punch, Small Oval Punch, 1/4" Pretty in Pink Grosgrain Ribbon, Basic Black Stampin' Write Marker, Stampin' Dimensionals

Monday, April 12, 2010

Baby Shower Card for Gwen and Joel

Our friends Gwen and Joel are expecting a baby girl in May. Yesterday was their shower and this is the card I made for them. I didn't realize it when I made the card, but the shower theme was sweet peas and onsies. The table centerpieces and the party favors were onsies, so this card fit perfectly. I used the Baby Firsts set which has been retired for a while now, but I just love it. The little babies in it are so cute. Gwen is also a stamper, so now she wants to know how to make this card. I think I'll have to add it to my list of projects for monthly punch classes. Of course I'll have to wait until after the baby arrives and Gwen starts doing classes again though. Thanks for visiting!

Stamps: Baby Firsts (Retired)
Inks: Black StazOn
Paper: Whisper White Cardstock, Pink Piroutte Patterns DSP (Retired)
Accessories & Tools: 1 1/4" Circle Punch, Scallop Circle Punch, Paper Snips, 2-Way Glue Pen, Blush Blossom & Pretty in Pink Markers

Thursday, February 11, 2010

Happy New Baby Girl

I pulled out some Georgia Peach Designer Series Paper for this sweet baby card. I LOVE that paper! In fact, it's probably my favorite Designer Series Paper ever. Thankfully, I bought a couple of packages before it retired. This is the first time that I used the Scallop Edge Punch to punch entirely around a square or rectangle and I have to say, I don't think I did a bad job. It was a little tricky and it's not perfect, but for a first try it's pretty good. The brads on this card are a combination of Filigree Brads and Rhinestone Brads. Don't you love how they go together? I do! Well, I need to get back to making projects. Thanks for visiting!

Stamps: Fun & Fast Notes
Ink: Black StazOn, Regal Rose, Pretty in Pink
Paper: Georgia Peach DSP (retired), Regal Rose, Pretty in Pink & Whisper White CS
Accessories & Tools: Filigree Brads, Circle Fire Rhinestone Brads, Scallop Edge Punch, Blender Pens, Whisper White Taffeta Ribbon, Stampin' Dimensionals
