Friday, April 29, 2011

Punch Art Bride and Groom

Here's the punch project that I mentioned the other day. After this, I don't have anything new to post, so it looks like I need to get to work in my studio! Have no fear, I have to come up with some new projects for my stamp club and my punch classes, so I'll find something to do. Besides, it's just about time for the graduation projects to start coming and I already have one of those semi-planned in my head. I'm also planning some mini albums and some My Digital Studio projects, which means I'll probably have lots to post I'm sure. Wedding season is on the way and I wanted a wedding project for my customers, so we made this card in my April punch class. I like the punched "bride" and "groom" but I thought they might be a little too cute for my taste until I made this card. That may seem like a strange comment, given that I do make what some would consider to be cute projects, it's just that I don't like wedding and cute together. While the idea of the punched "bride" and "groom" is very cute, this card is anything but cute. I think it's quite an elegant card, and I'm so happy with the end result. I'm thinking it's the combination of the Basic Pearls, Designer Series Paper, and the Decorative Label Punch that give this card its formal look. What do you think? Thanks for visiting!

Stamps: Occasional Quotes
Ink: Basic Black
Paper: Whisper White, Basic Gray, & Basic Black Card Stock, Neutrals Patterns DSP Stack
Accessories & Tools: Decorative Label, Full Heart XL, & Star XL Punches, Scalloped Heart of Hearts Embosslits, Vintage Wallpaper Textured Impressions Embossing Folder, Big Shot Machine, Basic Pearls, 1/4" Basic Black Grosgrain Ribbon, Stampin' Dimensionals, & Mini Glue Dots

Tuesday, April 26, 2011

Punchy Tulips for Spring

I know, I kind of disappeared again for a while; sorry! It was very short compared with the last time though, so hopefully you'll all forgive me. ;o) The last couple of weeks have been pretty hectic at our house, so I have had very little time to stamp. Usually weekends are my time to play "catch up" if I haven't been able to stamp midweek, but the past two weekends have been full of activities. It doesn't look as though there is an end in sight, but I know things HAVE to slow down at some point, because the end of the school year will be coming soon. This card is one of the projects that I did for my punch class last month. I thought we needed something a little springy with all of the chilly weather we've STILL been having; oh how I wish the temps would warm up a bit. I had been going through a period where I was really having fun with my punch projects, and I do have another punch project that I will post in a few days, but other than that, I haven't made anything else with punches in a while, so I'll have to start playing with them again soon. In the meantime, I hope you enjoy these pink tulips. Thanks for visiting!

Stamps: Short & Sweet
Ink: Old Olive & Regal Rose
Paper: Whisper White, Certainly Celery, Old Olive, Regal Rose & Pretty in Pink Card Stock, Subtles Patterns Designer Series Paper Stack
Accessories & Tools: 1-3/4"x7/8" Oval Large, Scallop Oval XL, & Two-Step Bird XL Punches, Subtles Designer Buttons, Sponge Daubers, 1/4" Pretty in Pink Grosgrain Ribbon, Stampin' Dimensionals, Paper Snips, & Mini Glue Dots

Sunday, April 10, 2011

Spring is Blossoming!

That's right, it's true, spring really is blossoming! This winter seemed like the winter that would never end, but I've never seen one yet that didn't. Besides, my daffodils and hyacinths are poking their little heads up out of the ground which is a sure sign that spring is here. My flowers will be in full bloom before too long.

There are signs of spring at Stampin' Up! too. Until the 30th of April, Stampin' Up! is giving you a chance to not only see, but to own two brand new items from the 2011~2012 Stampin' Up! Idea Book and Catalog before the catalog is even released!

During Stampin' Up!'s Spring is Blossomin
g Promotion, you'll be able to purchase the Four Frames Stamp Set and Paisley Petals Designer Series Paper (with qualifying purchase), or earn them for free! (when you host a qualifying workshop).

Four Frames Stamp Set

Paisley Petals Designer Series Paper

Note that online orders are not eligible for the hostess option of this promotion. This offer is valid until April 30th. Please contact me with questions or to place an order. Thanks for visiting!

Sunday, April 3, 2011

The Post That Almost Wasn't

That's right, I almost didn't post this project because my posting issues drove me up the wall (and that's putting it mildly). So I had a theory about what happened to the spacing with my last two posts. I thought if I left a post as a draft to go back and complete later, the spacing issues would happen, because my last two posts were both left as drafts that I went back to finish later, and both of them had the same problem with spacing. As it turns out, I was wrong, but it took three attempts at posting this latest post to determine that my problems were from my browser, not from leaving posts as unfinished drafts. Talk about a waste of time! I'm so hoping I don't have to go through those headaches again.

Anyway, on to my post. One of the little perks of being a Stampin' Up! demonstrator, is that I usually have lots of treats around for Easter baskets, Christmas stockings, Valentine's Day, etc. If I do something simply as a sample, then I have one of that project, and if I do something for a class or stamp camp, then I have two because I make a sample that I can photograph for my class flyers and customer mailings, and then I make a second when I have the class or camp. My kids always think that they get pretty cool treats too which is nice, because it makes them feel special. I know that they have their favorite sweet treats but seriously, I could put your basic, every day, run-of-the-mill, store-bought cookie in every treat pouch or box I make and they would still think it was the best thing in the world. OK, well maybe I wouldn't go THAT far, because there is only one kind of store-bought cookie my family likes, but you get the picture. With Easter being just around the corner, I thought this little treat box would be perfect for someone's basket. The box dimensions are 2-1/4"x3"x3-1/2" so it can hold a variety of items. Right now the only thing I have in mine is crimped paper, but I'm thinking that truffles might be a hit in this. My bunny and grass are made entirely of punches, some of which are retired (see supply list), but some of the newer punches could be used. For example, I used the retired 1/4" circle punch for the nose, however, you could use the circle punch from the Itty Bitty Shapes Punch Pack to make the nose. The new punch would just make it a bit bigger. I also used a retired cardstock color for the body of my bunny, but Crumb Cake would be a good substitute. I just think he's so cute and I hope you do too; it would make all of my posting headaches worth it. Thanks for visiting! (By the way, if you're wondering what kind of store-bought cookies my family will eat, you can find them here).

Stamps: None
Ink: Creamy Caramel (retired), Pink Piroutte, & Sahara Sand
Paper: Whisper White, Basic Black, Pretty in Pink, Creamy Caramel (retired), Certainly Celery, & Pink Pirouette Cardstoc
Accessories & Tools: 1-3/4", 1-1/4", 3/4", 1/2", 1/4" (retired) & 1/8" (retired) Circle Punches, Star XL, 1-3/4"x7/8" Oval Large, 1-3/8"x5/8" Oval Large & 2"x1-3/8" Oval XL Punches, 5/8" Certainly Celery Grosgrain Ribbon, White Gel Pen, Sponge Daubers, Sahara Sand Marker, 2-Way Glue Pen, Sticky Strip & Stampin' Dimensionals


Thursday, March 31, 2011

Two Kinds of Cupcakes

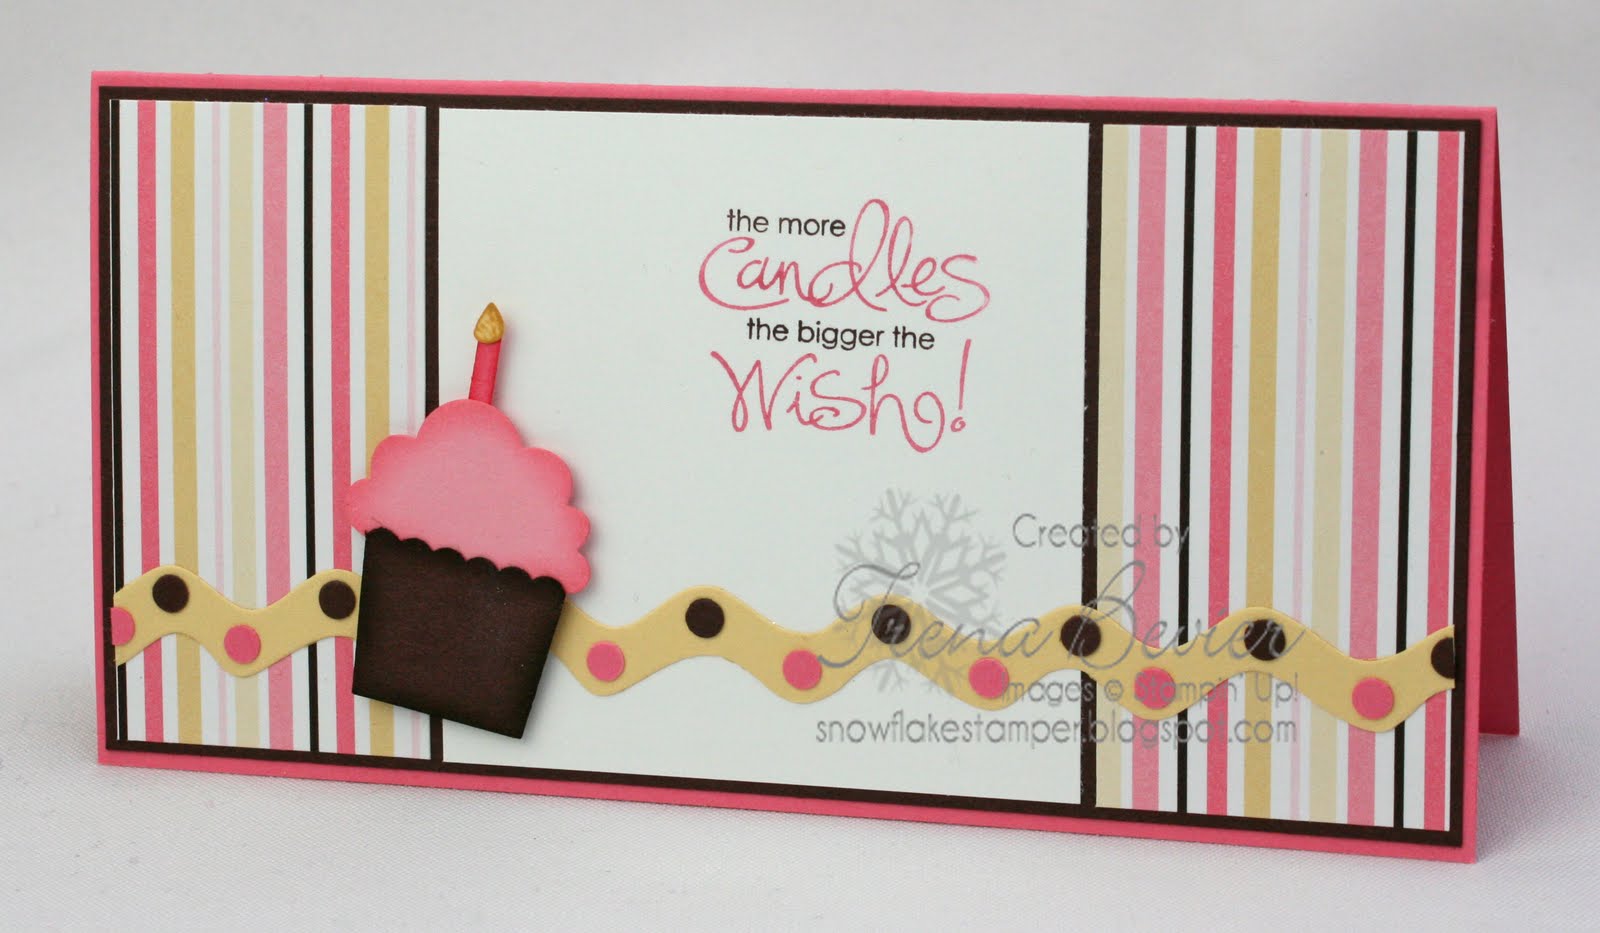
I'm still on my cupcake kick - I'm pretty sure I always will be. I made some cupcakes last week for my daughter's TA (for those of you who don't have children in school, a TA is basically a homeroom). I made a cake for her birthday and I had just enough batter and icing left to make cupcakes for her to take to school. Cupcakes ~ breakfast of champions! I'm totally kidding, although they really did eat them in the morning. I would have preferred it if the kids had saved them 'til lunch, but I knew that wasn't much of a possibility once they left the house. Can you imagine giving a group of teenagers cupcakes in the morning and telling them they HAVE to wait until lunch? I shudder just thinking about the protests. Anyway, my cupcakes haven't only been the ones with sugar, eggs, and flour as you can see by my project for this post. I wanted a card for an older sketch challenge and this is what I made. This Build a Cupcake Punch is sooo cute ~ I used it last week for a different project with my stamp club and my customers loved it! The striped paper I used for this card is from a retired Simply Scrappin' Kit. Sometimes I'm ready for products to retire, but there are other products that I can't get enough of and this kit is one that I definitely miss. The colors in it are "my colors" and the paper adds a sense of whimsy to this card. To create the border, I simply punched cardstock circles and glued them to the rick rack. It's such a fun card and it was oh so easy to make. Thanks for visiting!

Stamps: Whimsical Words (retired) Ink: Chocolate Chip, Pretty in Pink, Regal Rose & So Saffron Paper: Whisper White, Choclate Chip, Pretty in Pink, Regal Rose & So Saffron Cardstock Accessories & Tools: Build a Cupcake XL Punch, 2-Way Glue Pen, Non-Stampin' Up! Die (for rick rack), Love Sparkles Simply Scrappin' Kit (retired), Choclate Chip & Regal Rose Markers, Sponge Daubers, Stampin' Dimensionals

Monday, March 28, 2011

Signs of Spring

Just when I thought the weather might actually be nice for a reasonable period of time, it got cold again. I thoroughly enjoyed the warm days that we had a week or so ago but now that it's back to freezing, I'm a little dissatisifed. Having lived in northern New England since birth, I should have known better than to be optimistic when it comes to Spring weather here. As Mark Twain once wrote, "If you don't like the weather in New England, just wait a few minutes." Isn't that the truth. Don't get me wrong, I LOVE Winter (yes, I really did just say that), it's just that this one has been particularly long and at this point, I'm so over it. I'm longing to go out for a walk without having to wear 10 layers of clothing, to put the hammock out in the back yard so that I can relax and read (while soaking up the sun), and to work in my flower beds which were painfully neglected last summer. While inspecting the flower bed in front of our house on one of the recent warm days, I spotted the smallest shoots of green indicating that my daffodils and hyacinths are planning their return. It doesn't seem that they will be making an appearance any time soon though, so I guess I'll have to make do with stamped flowers instead, and I'll continue to remind myself that Spring truly is on its way. Thanks for visiting!

Stamps: Wagon Full of Fun (retired) Ink: Black StazOn, Certainly Celery, Chocolate Chip, Daffodil Delight & Crumb Cake Paper: Whisper White, Pink Pirouette, Chocolate Chip & Certainly Celery Cardstock, Sweet Pea (retired) & Brights Patterns DSP Stacks Accessories & Tools: Paper-Piercing Tool, Aqua Painter, Certainly Celery 1/8" Taffeta Ribbon, Earth Elements Buttons (retired), Pretty in Pink Sending Love Epoxy Brads (retired), Stampin' Dimensionals, Mini Glue Dots

(ETA: It seems my earlier spacing issues were browser issues. Once I used another browser, I was able to fix things)

Wednesday, March 23, 2011

Pea-in-a-Pod Page

I did this scrapbook page as one of the projects for my February Punch Class. My original plan was to have the part where the photo is flip up to reveal the baby 411 underneath, making it a birth announcement. Unfortunately, I don't have a stamp set for birth announcements, so I just made it a scrapbook page. I still think it would make a cute birth announcement if you have the stamp set to do it though. Thanks for visiting!

Stamps: Baroque Motifs
Ink: Old Olive, Certainly Celery, Blush Blossom (retired) & Pretty in Pink
Paper: Pretty in Pink, Blush Blossom (retired), Whisper White, Old Olive & Certainly Celery Cardstock
Accessories & Tools: 2"x1-3/8" Oval XL, 3/4" Circle Medium, 1/2" Circle Small & Itty Bitty Shapes Punch Pack Punches, Basic Pearls, Sponge Daubers, White Gel Pen, Black Marker, 2-Way Glue Pen, Stampin' Dimensionals