Thursday, March 31, 2011

Two Kinds of Cupcakes

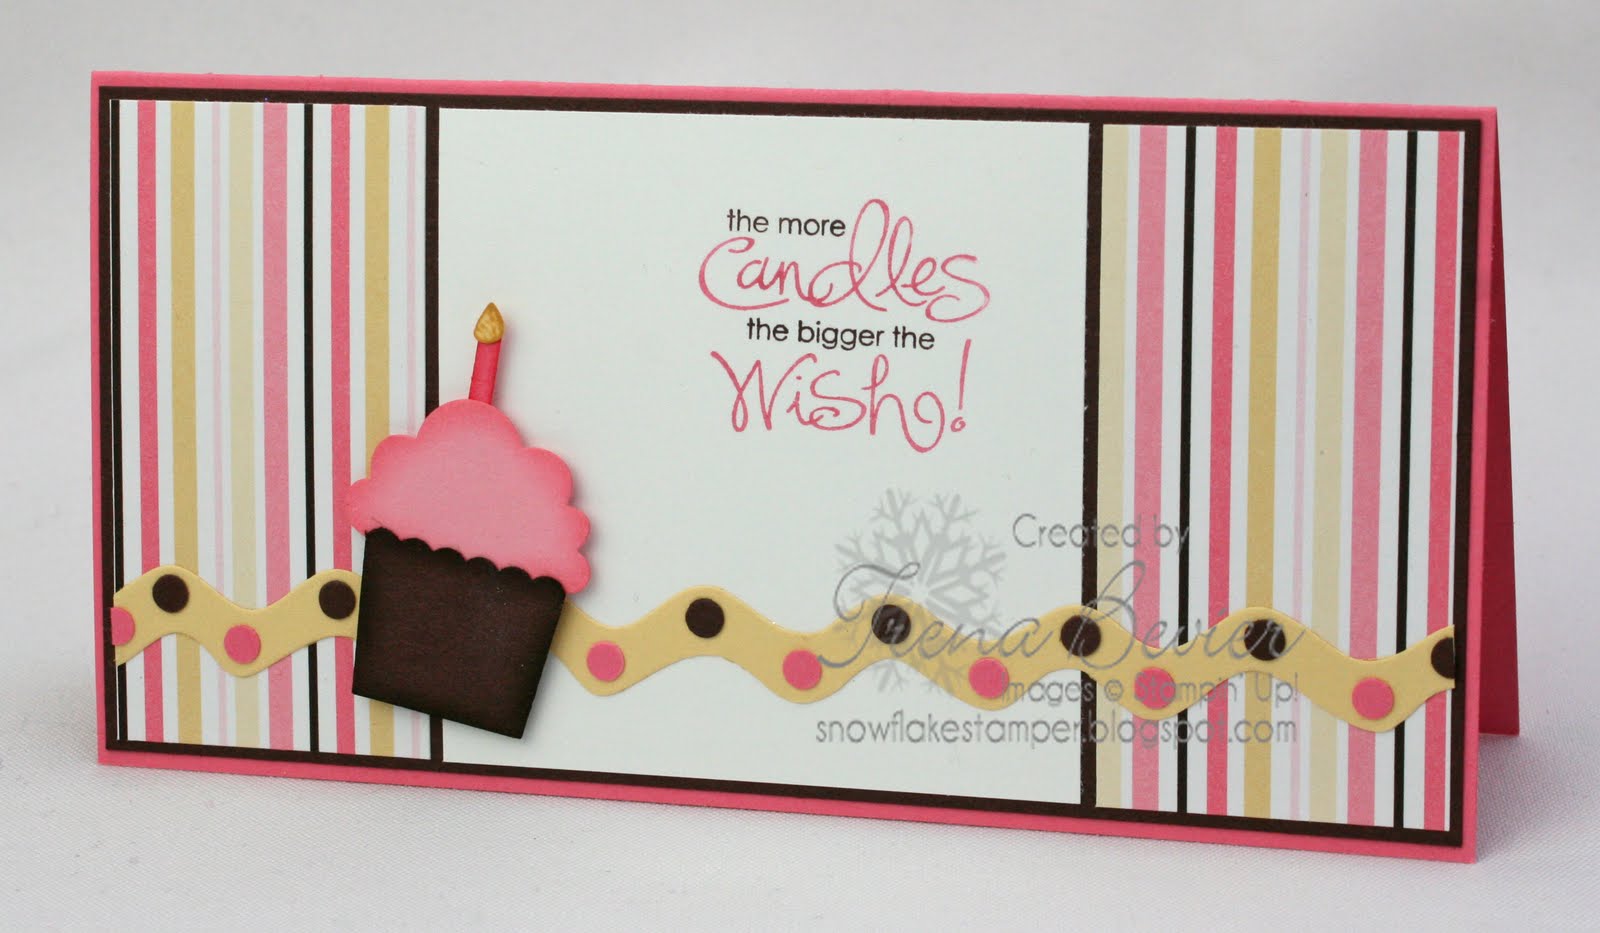
I'm still on my cupcake kick - I'm pretty sure I always will be. I made some cupcakes last week for my daughter's TA (for those of you who don't have children in school, a TA is basically a homeroom). I made a cake for her birthday and I had just enough batter and icing left to make cupcakes for her to take to school. Cupcakes ~ breakfast of champions! I'm totally kidding, although they really did eat them in the morning. I would have preferred it if the kids had saved them 'til lunch, but I knew that wasn't much of a possibility once they left the house. Can you imagine giving a group of teenagers cupcakes in the morning and telling them they HAVE to wait until lunch? I shudder just thinking about the protests. Anyway, my cupcakes haven't only been the ones with sugar, eggs, and flour as you can see by my project for this post. I wanted a card for an older sketch challenge and this is what I made. This Build a Cupcake Punch is sooo cute ~ I used it last week for a different project with my stamp club and my customers loved it! The striped paper I used for this card is from a retired Simply Scrappin' Kit. Sometimes I'm ready for products to retire, but there are other products that I can't get enough of and this kit is one that I definitely miss. The colors in it are "my colors" and the paper adds a sense of whimsy to this card. To create the border, I simply punched cardstock circles and glued them to the rick rack. It's such a fun card and it was oh so easy to make. Thanks for visiting!

Stamps: Whimsical Words (retired) Ink: Chocolate Chip, Pretty in Pink, Regal Rose & So Saffron Paper: Whisper White, Choclate Chip, Pretty in Pink, Regal Rose & So Saffron Cardstock Accessories & Tools: Build a Cupcake XL Punch, 2-Way Glue Pen, Non-Stampin' Up! Die (for rick rack), Love Sparkles Simply Scrappin' Kit (retired), Choclate Chip & Regal Rose Markers, Sponge Daubers, Stampin' Dimensionals

Monday, March 28, 2011

Signs of Spring

Just when I thought the weather might actually be nice for a reasonable period of time, it got cold again. I thoroughly enjoyed the warm days that we had a week or so ago but now that it's back to freezing, I'm a little dissatisifed. Having lived in northern New England since birth, I should have known better than to be optimistic when it comes to Spring weather here. As Mark Twain once wrote, "If you don't like the weather in New England, just wait a few minutes." Isn't that the truth. Don't get me wrong, I LOVE Winter (yes, I really did just say that), it's just that this one has been particularly long and at this point, I'm so over it. I'm longing to go out for a walk without having to wear 10 layers of clothing, to put the hammock out in the back yard so that I can relax and read (while soaking up the sun), and to work in my flower beds which were painfully neglected last summer. While inspecting the flower bed in front of our house on one of the recent warm days, I spotted the smallest shoots of green indicating that my daffodils and hyacinths are planning their return. It doesn't seem that they will be making an appearance any time soon though, so I guess I'll have to make do with stamped flowers instead, and I'll continue to remind myself that Spring truly is on its way. Thanks for visiting!

Stamps: Wagon Full of Fun (retired) Ink: Black StazOn, Certainly Celery, Chocolate Chip, Daffodil Delight & Crumb Cake Paper: Whisper White, Pink Pirouette, Chocolate Chip & Certainly Celery Cardstock, Sweet Pea (retired) & Brights Patterns DSP Stacks Accessories & Tools: Paper-Piercing Tool, Aqua Painter, Certainly Celery 1/8" Taffeta Ribbon, Earth Elements Buttons (retired), Pretty in Pink Sending Love Epoxy Brads (retired), Stampin' Dimensionals, Mini Glue Dots

(ETA: It seems my earlier spacing issues were browser issues. Once I used another browser, I was able to fix things)

Wednesday, March 23, 2011

Pea-in-a-Pod Page

I did this scrapbook page as one of the projects for my February Punch Class. My original plan was to have the part where the photo is flip up to reveal the baby 411 underneath, making it a birth announcement. Unfortunately, I don't have a stamp set for birth announcements, so I just made it a scrapbook page. I still think it would make a cute birth announcement if you have the stamp set to do it though. Thanks for visiting!

Stamps: Baroque Motifs
Ink: Old Olive, Certainly Celery, Blush Blossom (retired) & Pretty in Pink
Paper: Pretty in Pink, Blush Blossom (retired), Whisper White, Old Olive & Certainly Celery Cardstock
Accessories & Tools: 2"x1-3/8" Oval XL, 3/4" Circle Medium, 1/2" Circle Small & Itty Bitty Shapes Punch Pack Punches, Basic Pearls, Sponge Daubers, White Gel Pen, Black Marker, 2-Way Glue Pen, Stampin' Dimensionals

Sunday, March 20, 2011

Build a Cupcake Birthday Card

If I haven't said it before I will now; I'm a sucker for anything to do with cupcakes. When this Build a Cupcake Punch was released, it was the first thing on my wishlist (along with the Create a Cupcake stamp set) because I knew I couldn't live without it. OK, so maybe I could live without it, but I really, really wanted it. For this card I used Sweet Sunday Sketch Challenge 89. I did a little sponging on the cupcake pieces to give them a bit more dimension, and added some accents with a white gel pen as well. The buttons are the retired corduroy buttons, but you could easily substitute the 5/8" Jumbo Brads. I also used the Patterns Designer Series Paper, of which I am a huge fan. Thanks for visiting!

Stamps: Create a Cupcake
Ink: Regal Rose, Pretty in Pink & Chocolate Chip
Paper: Very Vanilla, Regal Rose & Chocolate Chip Cardstock, Brights & Subtles Patterns DSP Stacks
Accessories & Tools: Build a Cupcake & Scallop Edge Border Punches, Chocolate Chip Corduroy Buttons (retired), Sponge Daubers, uni-ball® Signo Gel Pen, Stampin' Dimensionals

Thursday, March 17, 2011

Turtle Trio

I should start by saying that this is not one of my favorite cards I've ever made. Seriously, I think it's cute, but it's just not my usual. I used Sweet Sunday Sketch 85 for this card and I knew that I wanted to use this turtle stamp, but it's not exactly what I had in mind. I guess we all have those projects that we like but don't necessarily love though, so it's OK. Thanks for visiting!

Stamps: It's the Thought (retired)
Ink: Black StazOn, Old Olive & Not Quite Navy
Paper: Old Olive, Whisper White, Not Quite Navy & Bashful Blue Cardstock, Maine Blueberry DSP (retired)
Accessories & Tools: 1/4" Old Olive Grosgrain Ribbon, Aqua Painter, Old Olive Marker, Earth Elements Brads (retired), Scallop Edge Border & 1 1/4" Square Punches, Stampin' Dimensionals

Monday, March 14, 2011

Hello Kitty!

After seeing a few Hello Kitty cards out there on the web, I knew that I'd have to make her for one of my monthly punch classes. This is one of the projects we did in my February punch class and my customers loved it! It's such a fun card with this striking color combination, and the kitty is so cute. Thanks for visiting!

Stamps: Teeny Tiny Wishes
Ink: Melon Mambo
Paper: Whisper White, Baasic Black & Melon Mambo Cardstock, Brights & Neutrals Patterns Designer Series Paper Stack
Accessories & Tools: 2" x 1 3/8" Oval XL, Modern Lable XL, 1 1/4" Square, Word Window Large, Heart to Heart XL, Horizontal Slot (retired) & Itty Bitty Shapes Punches, 2-Way Glue Pen, 1/2" Melon Mambo Polka-Dot Grosgrain Ribbon, Stampin' Dimensionals

Friday, March 11, 2011

Snowboard Mojo

I made this card in honor of all of the snowboarders in my life, of which there are many. I used this Mojo Monday Sketch, but turned the sketch on its side. I intentionally stepped outside of my comfort zone with this card ~ if you're familiar with my work then you know these colors are not typical of my projects, but I love the way it turned out. It got the seal of approval from my snowboarders too, so I'm happy. Thanks for visiting!

Stamps: Extreme Snowboard
Ink: Blue Bayou (retired)
Paper: Whisper White, Blue Bayou (retired), Crumb Cake & Chocolate Chip Cardstock, Neutrals Patterns Designer Series Paper Stack
Accessories & Tools: Blue Bayou double-Stitched Ribbon (retired), Star Punch (retired), Coluzzle (retired), Pewter Hodgepodge Hardware (retired), Paper-Piercing Tool, Stampin' Dimensionals

Tuesday, March 8, 2011

Another Past Sketch Challenge Card

I used Sweet Sunday Sketch Challenge 59 as the inspiration for this card. I'm trying to do the current challenges too, but I'm still playing "catch up" from all of the months that I missed. It was difficult cutting around those little bee legs, but it was worth it. Keep checking back 'cause I have lots of projects to add. Thanks for visiting!

Stamps: Just Buzzin' By
Ink: Black StazOn, Daffodil Delight, Early Espresso & Crumb Cake
Paper: Whisper White, Basic Black & Daffodil Delight Cardstock, Brights Patterns Designer Series Paper Stack
Accessories & Tools: Big Shot Machine, Perfect Polka Dots Embossing Folder, Paper-Piercing Tool, Paper Snips, Circle Fire Rhinestone Brads, Aqua Painter, Stampin' Dimensionals

Sunday, March 6, 2011

Merci, Sweet Sunday Style

I don't know why, but I'm having camera issues today. Even with the lighting, my photos are looking very dark. I've changed the aperture, the shutter speed, the white balance; everything it seems. Nothing has worked. Rather than spend the rest of my day messing with all of it, I decided that it's good enough as it is. This way, I can get my post done for tomorrow and spend the afternoon relaxing or doing something fun. I used Karen Giron's Sweet Sunday Sketch Challenge 107 for this card. If you visit Karen's blog, you'll see that she very nicely put the measurements that she used for this sketch in her post. Of course me being me, I didn't read the entire post before starting my card, so I had to fuss with things a bit in order to get a size that worked. For my card, the small rectangles are 1-1/4" x 1-1/2" (this measurement is for the cardstock, the Designer Series Paper is 1-1/8" x 1-3/8"). I'll admit that I made a little mistake when I made this card and I'll tell you, even though you can't see it. I originally stamped "merci" on my Very Vanilla Cardstock, but it was crooked. Not wanting to waste the cardstock, I decided to use the label punches and ribbon to cover up my mistake. It's actually better than it would have been had I not made the mistake, so that's one mistake I'm happy to have made. I guess that cloud had a silver lining. Thanks for visiting!

Stamps: Chic Boutique
Ink: Soft Suede & Baja Breeze
Paper: Very Vanilla, Baja Breeze, Soft Suede & Crumb Cake Cardstock, Elegant Soirée DSP
Accessories & Tools: Scallop Edge Border, Word Window Large & Modern Label XL Punches, Crumb Cake 1/2" Seam Binding Ribbon, Basic Pearls, Stampin' Dimensionals

More Wedding Cupcakes

I spent the last couple of days making more cupcakes; thank goodness I can send them to work with my husband otherwise, our family would all weigh far too much. Since cupcakes are all the rage with weddings right now, I decided that I wanted to make more wraps and some toppers for them. I used my Perfect Setting die to make the wraps, embossing the one on the top left before I cut it. I used a variety of dies and punches to create the picks. Thanks for visiting!

Stamps: None
Ink: None
Paper: Neutrals Patterns DSP Stack, Whisper White & Basic Black Cardstock
Accessories & Tools: Big Shot Machine, Perfect Setting Bigz XL Die, Scalloped Heart of Hearts Embosslit, Lots of Tags Sizzlits, Itty Bitty Shapes Punch Pack, Star XL, Full Heart XL & 2"x1-3/8" Oval XL Punches, Mini Glue Dots, Stampin' Dimensionals, Basic Gray Taffeta Ribbon (retired), Basic Pearls, Stampin' Dimensionals, 1/4" Black Grosgrain Ribbon, Toothpicks

Friday, March 4, 2011

Sweet Sunday Birthday

Here's a birthday card based on Sweet Sunday Sketch Challenge 73. I said I used a lot of those sketches to get me back into my stamping groove again and I meant it. I'm loving this Sweet & Sour Specialty paper; the colors and patterns in it are so fun! This was an easy card to make, with a few layers of paper and a couple of accessories to spice it up a bit. Thanks for visiting!

Stamps: Fun & Fast Notes
Ink: Black StazOn, Pumpkin Pie & Rose Red
Paper: Pumpkin Pie, Very Vanilla & Rose Red Cardstock, Sweet & Sour Specialty Paper
Accessories & Tools: Circle Scissor Plus, Aqua Painter, 2-Way Glue Pen, Dazzling Diamonds Glitter, 1/4" Pumpkin Pie Grosgrain Ribbon, Rich Regals Buttons (retired)

Wednesday, March 2, 2011

Embossed Cupcake

When you saw the title of this post, is this what you had in mind? I didn't think so. Sometimes I can get a little crazy with my projects (in a good way of course) which is kind of what happened here. When I was icing those yummy cupcakes that I posted earlier, I got to thinking about how I've used fondant to ice cakes, but never cupcakes. That got me thinking about how cool it would be to emboss some fondant and ice a cupcake with it, and that's exactly what I did. For those of you who aren't familiar with fondant, the best way to describe it is that it's like edible play-dough. Just about anything can be done with it. For this, I simply rolled out my fondant, placed my open embossing folder on top, and rolled over that with my rolling pin. It's that simple. Of course it would take forever to create 150 of these babies, but it was still a fun little experiment and I really like the end results. I hope you do too. Thanks for visiting!

Stamps: None
Ink: None
Paper: Very Vanilla Cardstock
Accessories & Tools: Big Shot Machine, Bigz Perfect Setting Die, Finial Press Embossing Folder, Sticky Strip

Wedding Cupcakes

I did a little baking over the weekend because I've had cupcakes on the brain recently. It all began when my friend Gwen made these amazing lime cupcakes about a week ago (you can find the info. for the recipe here on her blog and trust me, you want to try them). Anyway, after Gwen made her cupcakes, I had the urge to make my own cupcakes, so I made these really yummy white cupcakes with buttercream icing. I have friends who are getting married this summer and the bride-to-be wanted to see photos of my cupcakes because she and her fiancé are interested in having cupcakes for their wedding. Well, I couldn't take photos of cupcakes in plain cupcake liners now could I? Instead I decided to make cupcake wrappers using my Bigz Perfect Setting Die. I didn't decorate the cupcake wrappers or anything like that, I just left them plain. These could be stamped or embossed, or ribbon or other accessories could be added, but even plain I think they make a beautiful presentation for cupcakes. What do you think? I have another cupcake project that I'll post soon. I don't want to give too much away, but I can tell you it's nothing like this project. Thanks for visiting!

Stamps: None
Ink: None
Paper: Very Vanilla Cardstock
Accessories & Tools: Big Shot Machine, Bigz Perfect Setting Die, Sticky Strip

Tuesday, March 1, 2011

Humor Me Please

I know it's another Christmas project, but I just HAD to post this one! This is what happens when boredom sets in at our house. OK, I'm kidding. The photos I used for this card are of our friends Gwen and Joel's baby Brooke. Gwen is really into stamping, scrapbooking, photography & a lot of the same things in which I'm interested. Anyway, she had this fun idea for Christmas card photos where she would string Brooke in lights, just like a tree. Since I studied a little bit of photography in college, she asked me to help her with her project. It took us most of the day, but Brooke was so good-natured about the whole thing and we both got some really good photos. This card is one that I made with My Digital Studio as a sample to show my customers. Thanks for visiting!

My Digital Studio Elements Used: Christmas Jingle Digital Kit, Old Olive & Whisper White Cardstock, Real Red Small Polka Dot DSP, White Grosgrain Ribbon & Bow, Real Red & Old Olive 3/16" Brads, Scallop Edge Punch, Wishes & Greetings Stamp Brush Set